# 线程之间的共享和协作
# 一、线程间的共享
# 1、synchronized 内置锁
Java 支持多个线程同时访问一个对象或者对象的成员变量,关键字 synchronized 可以修饰方法或者以同步块的形式来进行使用,它主要确保多个线程在同一个时刻,只能有一个线程处于方法或者同步块中,它保证了线程对变量访问的可见性和排他性,又称为内置锁机制。
# 对象锁
对象锁是用于对象实例方法,或者一个对象实例上,对象锁锁的是对象实例。
下面是对象锁的例子:
public class SyncTest {

    private long count = 0;

    /**
     * 作为一个锁
     */
    private Object obj = new Object();

    /**
     * 用在同步块上
     */
    public void increment() {
        synchronized (obj) {
            count++;
        }
    }

    /**
     * 用在方法上,锁的是当前对象实例
     */
    public synchronized void increment2() {
        count++;
    }

    /**
     * 用在同步块上,但是锁的是当前类的对象实例
     */
    public void increment3() {
        synchronized (this) {
            count++;
        }
    }

    /**
     * 定义线程
     */
    private static class Count extends Thread {

        private SyncTest syncTest;

        public Count(SyncTest syncTest) {
            this.syncTest = syncTest;
        }

        @Override
        public void run() {
            for (int i = 0; i < 10000; i++) {
                syncTest.increment();
            }
        }
    }

    public static void main(String[] args) throws InterruptedException {
        SyncTest syncTest = new SyncTest();
        // 启动两个线程
        Count count1 = new Count(syncTest);
        Count count2 = new Count(syncTest);
        count1.start();
        count2.start();
        Thread.sleep(50);
        System.out.println(syncTest.count);
    }
}
2
3
4
5
6
7
8
9
10
11
12
13
14
15
16
17
18
19
20
21
22
23
24
25
26
27
28
29
30
31
32
33
34
35
36
37
38
39
40
41
42
43
44
45
46
47
48
49
50
51
52
53
54
55
56
57
58
59
60
61
62
63
64
运行结果:
20000
synchronized 在 increment() 中,作用在同步块上,锁的是 obj 对象;在 increment2() 中作用在方法上,锁的是当前类 SyncTest 的对象实例;在increment3() 中作用在 this 上,锁的是当前类 SyncTest 的对象实例。
当锁的对象实例不一样,也是可以并行执行的:
public class DiffInstance {

    private static class SyncInstance implements Runnable {

        private DiffInstance diffInstance;

        public SyncInstance(DiffInstance diffInstance) {
            this.diffInstance = diffInstance;
        }

        @Override
        public void run() {
            System.out.println("SyncInstance is running ... " + diffInstance);
            diffInstance.instance();
        }
    }

    private static class SyncInstance2 implements Runnable {
        private DiffInstance diffInstance;

        public SyncInstance2(DiffInstance diffInstance) {
            this.diffInstance = diffInstance;
        }

        @Override
        public void run() {
            System.out.println("SyncInstance2 is running ... " + diffInstance);
            diffInstance.instance2();
        }
    }

    private synchronized void instance() {
        SleepTool.second(3);
        System.out.println("SyncInstance is going ... " + this.toString());
        SleepTool.second(3);
        System.out.println("SyncInstance ended " + this.toString());
    }

    private synchronized void instance2() {
        SleepTool.second(3);
        System.out.println("SyncInstance2 is going... " + this.toString());
        SleepTool.second(3);
        System.out.println("SyncInstance2 ended " + this.toString());
    }

    public static void main(String[] args) {
        // 只有锁的是同一个实例对象的时候,才能禁止并行执行
        DiffInstance instance = new DiffInstance();
        Thread thread = new Thread(new SyncInstance(instance));
        DiffInstance instance2 = new DiffInstance();
        Thread thread2 = new Thread(new SyncInstance2(instance2));
        thread.start();
        thread2.start();
        SleepTool.second(1);
    }
}
2
3
4
5
6
7
8
9
10
11
12
13
14
15
16
17
18
19
20
21
22
23
24
25
26
27
28
29
30
31
32
33
34
35
36
37
38
39
40
41
42
43
44
45
46
47
48
49
50
51
52
53
54
55
56
运行结果:
SyncInstance is running ... com.doomthr.ch1.sync.DiffInstance@5e7f1b08
SyncInstance2 is running ... com.doomthr.ch1.sync.DiffInstance@568d9b4d
SyncInstance2 is going... com.doomthr.ch1.sync.DiffInstance@568d9b4d
SyncInstance is going ... com.doomthr.ch1.sync.DiffInstance@5e7f1b08
SyncInstance ended com.doomthr.ch1.sync.DiffInstance@5e7f1b08
SyncInstance2 ended com.doomthr.ch1.sync.DiffInstance@568d9b4d
2
3
4
5
6
可以看出,两个线程锁的是不同的两个 DiffInstance 类的实例,所以他们可以并行执行。如果锁的是同一个对象的话,那么 instance() 和 instance2() 两个方法就会一个执行完再执行另一个。
# 类锁
类锁是用于类的静态 方法或者一个类的 class 对象上,类锁锁的是类的 class 对象。
锁类 (class) 和锁 static 变量也是不同的,可以并行执行:
public class StaticAndClass {

    private static Object obj = new Object();

    private static class SyncClass extends Thread {

        @Override
        public void run() {
            System.out.println(currentThread().getName() + "(SynClass) is running ...");
            syncClass();
        }
    }

    private static class SyncStatic extends Thread {

        @Override
        public void run() {
            System.out.println(currentThread().getName() + "(SynStatic) is running ...");
            syncStatic();
        }
    }

    /**
     * 对 static 静态方法加锁,实际上锁的是 class 对象,这个 class 就是类拥有的唯一的那个 class 对象
     */
    private static synchronized void syncClass() {
        System.out.println(Thread.currentThread().getName() + "(SynClass) going...");
        SleepTool.second(1);
        System.out.println(Thread.currentThread().getName() + "(SynClass) end");
    }

    /**
     * 这里锁的是 static 变量
     */
    private static void syncStatic() {
        synchronized (obj) {
            System.out.println(Thread.currentThread().getName() + "(SynStatic) going ...");
            SleepTool.second(1);
            System.out.println(Thread.currentThread().getName() + "(SynStatic) end");
        }
    }

    public static void main(String[] args) {
        Thread t1 = new SyncClass();
        Thread t2 = new SyncStatic();
        t1.start();
        t2.start();
    }
}
2
3
4
5
6
7
8
9
10
11
12
13
14
15
16
17
18
19
20
21
22
23
24
25
26
27
28
29
30
31
32
33
34
35
36
37
38
39
40
41
42
43
44
45
46
47
48
49
运行结果:
Thread-0(SynClass) is running ...
Thread-0(SynClass) going...
Thread-1(SynStatic) is running ...
Thread-1(SynStatic) going ...
Thread-1(SynStatic) end
Thread-0(SynClass) end
2
3
4
5
6
类锁和对象锁之间也是互不干扰的:
public class InstanceAndClass {

    private static class SyncClass extends Thread {

        @Override
        public void run() {
            System.out.println("SyncClass is running ...");
            synClass();
        }
    }

    private static class SyncInstance implements Runnable {

        private InstanceAndClass instanceAndClass;

        public SyncInstance(InstanceAndClass instanceAndClass) {
            this.instanceAndClass = instanceAndClass;
        }

        @Override
        public void run() {
            System.out.println("SyncInstance is running ... ");
            instanceAndClass.instance();
        }
    }

    private synchronized void instance() {
        SleepTool.second(1);
        System.out.println("SyncInstance is going..." + this.toString());
        SleepTool.second(1);
        System.out.println("SyncInstance ended " + this.toString());
    }

    private static synchronized void synClass() {
        SleepTool.second(1);
        System.out.println("SyncClass going...");
        SleepTool.second(1);
        System.out.println("SyncClass end");
    }

    public static void main(String[] args) {
        InstanceAndClass synClassAndInstance = new InstanceAndClass();
        Thread t1 = new SyncClass();
        Thread t2 = new Thread(new SyncInstance(synClassAndInstance));
        t2.start();
        t1.start();
    }
}
2
3
4
5
6
7
8
9
10
11
12
13
14
15
16
17
18
19
20
21
22
23
24
25
26
27
28
29
30
31
32
33
34
35
36
37
38
39
40
41
42
43
44
45
46
47
48
执行结果:
SyncInstance is running ...
SyncClass is running ...
SyncClass going...
SyncInstance is going...com.doomthr.ch1.sync.InstanceAndClass@7f25713
SyncClass end
SyncInstance ended com.doomthr.ch1.sync.InstanceAndClass@7f25713
2
3
4
5
6
# 2、错误的加锁和原因分析
public class TestIntegerSyn {

    public static void main(String[] args) throws InterruptedException {
        Worker worker = new Worker(1);
        //Thread.sleep(50);
        for (int i = 0; i < 5; i++) {
            new Thread(worker).start();
        }
    }

    private static class Worker implements Runnable {

        private Integer i;
        private Object o = new Object();

        public Worker(Integer i) {
            this.i = i;
        }

        @Override
        public void run() {
            synchronized (i) {
                Thread thread = Thread.currentThread();
                i++;
                System.out.println(thread.getName() + "-------" + i + "--@" + System.identityHashCode(i));
                try {
                    Thread.sleep(1000);
                } catch (InterruptedException e) {
                    e.printStackTrace();
                }
            }

        }

    }
}
2
3
4
5
6
7
8
9
10
11
12
13
14
15
16
17
18
19
20
21
22
23
24
25
26
27
28
29
30
31
32
33
34
35
36
System.identityHashCode 这个方法的意思是,即使对象重写了 Object 的 hashCode() 方法,这个方法仍然会返回 Object 原生的 hashCode() 方法。
这段代码中启动了5个线程,将创建的 worker 传给了5个线程,并且对 i 进行了加锁,按理说应该输出内容 i 应该是从2开始,依次是2、3、4、5、6,但是实际的运行结果是:
Thread-1-------3--@1506719561
Thread-4-------6--@1256003415
Thread-3-------5--@1317694483
Thread-0-------3--@1506719561
Thread-2-------4--@1356977139
2
3
4
5
这是为什么呢,通过反编译这个类的 class 文件后可以看出来,在执行 i++ 这一步操作的时候,实际上执行的代码是:
this.i = Integer.valueOf(this.i.intValue() + 1)
继续进入jdk中 Integer.valueOf() 方法可以看出在最后的返回值是:return new Integer(i) ,也就是说在进行 i++ 操作的时候,都会新创建一个 Integer 对象,所以上面每个线程中锁的对象都不一样,导致锁失效了。
所以这里如果想正常得到2、3、4、5、6的值的话,必须锁相同的对象,将锁的对象改为 o 就可以了。
# 3、volatile 最轻量的同步机制
volatile 保证了不同线程对这个变量进行操作时的可见性,即一个线程修改了某个变量的值,这个新值对其他线程来说是立即可见的。
public class VolatileCase {

    private volatile static boolean READY;
    private static int NUMBER;

    private static class PrintThread extends Thread {
        @Override
        public void run() {
            System.out.println("PrintThread is running.......");
            // 无限循环
            while (!READY) {
            }
            System.out.println("number = " + NUMBER);
        }
    }

    public static void main(String[] args) {
        new PrintThread().start();
        SleepTool.second(1);
        NUMBER = 51;
        READY = true;
        SleepTool.second(5);
        System.out.println("main is ended!");
    }
}
2
3
4
5
6
7
8
9
10
11
12
13
14
15
16
17
18
19
20
21
22
23
24
25
当变量 READY 不声明为 volatile 的时候,在 PrintThread 线程中是无法感知主线程对 READY 的改动的。
执行结果:
PrintThread is running.......
number = 51
main is ended!
2
3
但是 volatile 并不能保证在多个线程下对同一个变量进行写时候的安全:
public class NotSafe {

    private volatile long count = 0;

    public long getCount() {
        return count;
    }

    public void setCount(long count) {
        this.count = count;
    }

    public void increment() {
        count++;
    }

    private static class Count extends Thread {

        private NotSafe notSafe;

        public Count(NotSafe notSafe) {
            this.notSafe = notSafe;
        }

        @Override
        public void run() {
            for (int i = 0; i < 10000; i++) {
                notSafe.increment();
            }
        }
    }

    public static void main(String[] args) throws InterruptedException {
        NotSafe notSafe = new NotSafe();
        // 启动两个线程
        Count count1 = new Count(notSafe);
        Count count2 = new Count(notSafe);
        count1.start();
        count2.start();
        Thread.sleep(50);
        System.out.println(notSafe.count);
    }
}
2
3
4
5
6
7
8
9
10
11
12
13
14
15
16
17
18
19
20
21
22
23
24
25
26
27
28
29
30
31
32
33
34
35
36
37
38
39
40
41
42
43
这里尽管给 count 变量添加了 volatile 关键字,但是还是没办法保证两个线程同时写操作下的安全。
volatile 最适用的场景:一个线程写,多个线程读。
# 4、ThreadLocal 辨析
# (1) 与 synchronized 的比较
ThreadLocal 和 synchronized 都用于解决多线程并发访问。可是 ThreadLocal 与 synchronized 有本质的差别。synchronized 是利用锁的机制,使变量或代码块在某一时该仅仅能被一个线程訪问。而 ThreadLocal 为每个线程都提供了变量的副本,使得每个线程在某一时间访问到的并非同一个对象,这样就隔离了多个线程对数据的共享。
# (2) ThreadLocal 的基本使用:
public class UseThreadLocal {

    private static ThreadLocal<Integer> INT_LOCAL = ThreadLocal.withInitial(() -> 1);

    public void StartThreadArray() {
        Thread[] runs = new Thread[3];
        for (int i = 0; i < runs.length; i++) {
            runs[i] = new Thread(new TestThread(i));
        }
        for (int i = 0; i < runs.length; i++) {
            runs[i].start();
        }
    }

    /**
     * 类说明:测试线程,线程的工作是将ThreadLocal变量的值变化,并写回,看看线程之间是否会互相影响
     */
    public static class TestThread implements Runnable {
        int id;

        public TestThread(int id) {
            this.id = id;
        }

        public void run() {
            System.out.println(Thread.currentThread().getName() + ": start");
            Integer value = INT_LOCAL.get();
            value = value + id;
            INT_LOCAL.set(value);
            System.out.println(Thread.currentThread().getName() + ": " + INT_LOCAL.get());
        }
    }

    public static void main(String[] args) {
        UseThreadLocal test = new UseThreadLocal();
        test.StartThreadArray();
    }
}
2
3
4
5
6
7
8
9
10
11
12
13
14
15
16
17
18
19
20
21
22
23
24
25
26
27
28
29
30
31
32
33
34
35
36
37
38
运行结果:
Thread-0: start
Thread-2: start
Thread-0: 1
Thread-1: start
Thread-2: 3
Thread-1: 2
2
3
4
5
6
通过 ThreadLocal.withInitial(() -> 1) 对变量进行初始化,使用 get() 方法获取值,使用 set() 方法设置值。可以看出,通过 get() 方法获取到的值在每个线程中都是独立的副本,互相不受影响。
# (3) 实现解析
# get()
get() 方法可以获取当前线程所对应的线程局部变量。看看 ThreadLocal 的 get() 方法是怎么实现的:
    public T get() {
        Thread t = Thread.currentThread();
        ThreadLocalMap map = getMap(t);
        if (map != null) {
            ThreadLocalMap.Entry e = map.getEntry(this);
            if (e != null) {
                @SuppressWarnings("unchecked")
                T result = (T)e.value;
                return result;
            }
        }
        return setInitialValue();
    }
2
3
4
5
6
7
8
9
10
11
12
13
可以看出首先获取到当前运行的线程,然后将当前的线程作为参数传递给了 getMap() 方法,继续看看 getMap() 方法:
    ThreadLocalMap getMap(Thread t) {
        return t.threadLocals;
    }
2
3
这个方法直接返回了传递进来的线程的一个成员变量 threadLocals ,这个 threadLocals 又是什么东西呢?继续看可以看到:
ThreadLocal.ThreadLocalMap threadLocals = null;
这个 threadLocals 是 ThreadLocal 类的一个静态内部类 ThreadLocalMap 。
    static class ThreadLocalMap {

        /**
         * The entries in this hash map extend WeakReference, using
         * its main ref field as the key (which is always a
         * ThreadLocal object).  Note that null keys (i.e. entry.get()
         * == null) mean that the key is no longer referenced, so the
         * entry can be expunged from table.  Such entries are referred to
         * as "stale entries" in the code that follows.
         */
        static class Entry extends WeakReference<ThreadLocal<?>> {
            /** The value associated with this ThreadLocal. */
            Object value;

            Entry(ThreadLocal<?> k, Object v) {
                super(k);
                value = v;
            }
        }

        /**
         * The initial capacity -- MUST be a power of two.
         */
        private static final int INITIAL_CAPACITY = 16;

        /**
         * The table, resized as necessary.
         * table.length MUST always be a power of two.
         */
        private Entry[] table;

        ...

        private Entry getEntry(ThreadLocal<?> key) {
            int i = key.threadLocalHashCode & (table.length - 1);
            Entry e = table[i];
            if (e != null && e.get() == key)
                return e;
            else
                return getEntryAfterMiss(key, i, e);
        }
2
3
4
5
6
7
8
9
10
11
12
13
14
15
16
17
18
19
20
21
22
23
24
25
26
27
28
29
30
31
32
33
34
35
36
37
38
39
40
41
在 ThreadLocalMap 里面又定义了一个内部类 Entry ,这个 Entry 的构造方法中,需要的参数是一个键值对,键是 ThreadLocal 类型,值是 Object 类型,也就是在 ThreadLocal 中使用的那个泛型。在 ThreadLocalMap 中还有一个 table 成员变量,它是一个 Entry[] 类型,这里为什么是一个数组类型呢?这是因为在使用 ThreadLocal 的时候,我们会给它传一个泛型,一个泛型就对应了一个 Entry ,如果我们多定义一个 ThreadLocal ,传递一个新的泛型,那么它就会保存到 table 中。
继续回到 get() 方法中,当从线程中拿到 ThreadLocalMap 之后,调用 ThreadLocalMap 的 getEntry() 方法,通过传入 ThreadLocal 参数就拿到了我们定义泛型的那个值。
下面给一张帮助理解的图:
图中演示了两个线程并且定义了两个 ThreadLocal 类型的变量,这两个 ThreadLocal 类型的变量就对应到每个线程中 ThreadLocalMap 成员变量中的两个 Entry 变量,每个线程的 ThreadLocalMap 中的 Entry 都统一放在保存 Entry 数组的 table 中。
# set()
set() 方法用来设置当前线程的线程局部变量的值。 set() 方法的源码和 get() 方法的源码类似:
    public void set(T value) {
        Thread t = Thread.currentThread();
        ThreadLocalMap map = getMap(t);
        if (map != null)
            map.set(this, value);
        else
            createMap(t, value);
    }
2
3
4
5
6
7
8
也是从线程中获取 ThreadLocalMap 变量,当这个变量为空的时候,也就是第一次设置值的时候,会调用一个 createMap() 的方法:
    void createMap(Thread t, T firstValue) {
        t.threadLocals = new ThreadLocalMap(this, firstValue);
    }
2
3
在这个方法中对线程的threadLocals 进行初始化操作。
# initialValue()
initialValue() 方法用来返回该线程局部变量的初始值,源码:
    protected T initialValue() {
        return null;
    }
2
3
很显然,这个方法是为了让子类覆盖而设计的。这个方法是一个延迟调用方法,在线程第1次调用 get() 或 set() 时才执行,并且仅执行1次。ThreadLocal 中的默认实现直接返回一 个 null 。
# remove()
remove() 方法可以将当前线程局部变量的值删除,目的是减少内存的占用。该方法是 JDK 5.0 新增的方法。
在上面查看 ThreadLocalMap 源码的时候可以看到 Entry 是这么定义的:
        static class Entry extends WeakReference<ThreadLocal<?>> {
            /** The value associated with this ThreadLocal. */
            Object value;

            Entry(ThreadLocal<?> k, Object v) {
                super(k);
                value = v;
            }
        }
2
3
4
5
6
7
8
9
这里使用了 WeakReference 包裹着 ThreadLocal ,这个 WeakReference 就是 弱引用 ,说明在 Entry 中的这个 key ,也就是 ThreadLocal 是一个 弱引用 。
在Java中一共有4种引用:
- 强引用
所有 new 出来的对象都是强引用,只要强引用存在,是不会被垃圾回收掉的。
- 软引用
使用 SoftReference 定义的变量都是 软引用 ,当内存溢出发生垃圾回收时,首先回收所有不用的引用,当回收完毕后,内存还是不够用,那么此时就会回收掉 软引用 指向的引用。
- 弱引用
使用 WeakReference 定义的变量都是 弱引用 ,只要发生垃圾回收时,就会回收掉 弱引用 指向的引用。
- 虚引用
使用 PhantomReference 定义的变量都是 虚引用 ,这些引用是一定会被垃圾回收掉的,是最弱的引用。
ThreadLocal 在内存中栈和堆的图解:
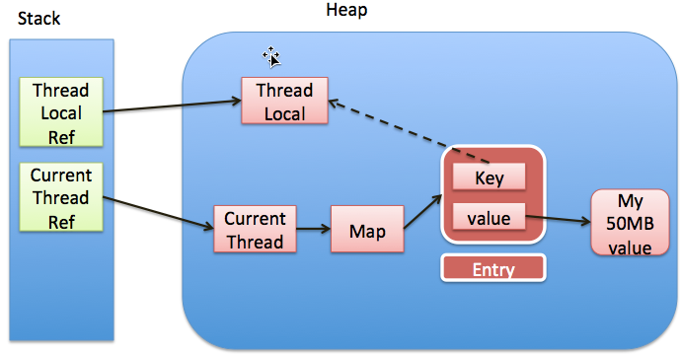
左侧栈中定义了一个 ThreadLocal 的引用和一个 线程 Thread 的引用,它们所指向的内存空间存放在右侧的堆中。当把 ThreadLocal 的变量置为 null 后,没有任何的强引用指向 ThreadLocal ,当发生垃圾回收的时候,Entry 中 key 所指向的 ThreadLocal 的引用就会被回收(图中虚线的部分),而当前线程所持有的的 ThreadLocalMap 是强引用,仍然存在的,ThreadLocalMap 还持有的 Entry ,此时由于Entry 中的 key 已经被回收掉了,所以 Entry 中的 value 再也访问不到了,也就造成了内存泄露。这部分资源直到当前 Thread 被回收后才会被回收掉。
另一方面,另一方面,当 ThreadLocal 不为空的时候,也就是说 ThreadLocal 的强引用还存在的时候,就说明 ThreadLocal 还在使用,即使 Entry 中的 TheadLocal 是一个 WeekReference ,那么此时 ThreadLocal 会因为有一个强引用在指向它,所以也不会被垃圾回收掉。
为了避免内存泄露,所以在用完 ThreadLocal 之后,需要调用它的 remove() 方法。最后再来看看这个 remove() 方法:
     public void remove() {
         ThreadLocalMap m = getMap(Thread.currentThread());
         if (m != null)
             m.remove(this);
     }
2
3
4
5
ThreadLocalMap 的 remove() 方法:
        private void remove(ThreadLocal<?> key) {
            Entry[] tab = table;
            int len = tab.length;
            int i = key.threadLocalHashCode & (len-1);
            for (Entry e = tab[i];
                 e != null;
                 e = tab[i = nextIndex(i, len)]) {
                if (e.get() == key) {
                    e.clear();
                    expungeStaleEntry(i);
                    return;
                }
            }
        }
2
3
4
5
6
7
8
9
10
11
12
13
14
其中 expungeStaleEntry() 就会将当前 Entry 中的 value 一起回收掉。
其实在上面的 get() 方法中,有一行代码是:
ThreadLocalMap.Entry e = map.getEntry(this);
这个 getEntry 的代码:
        private Entry getEntry(ThreadLocal<?> key) {
            int i = key.threadLocalHashCode & (table.length - 1);
            Entry e = table[i];
            if (e != null && e.get() == key)
                return e;
            else
                return getEntryAfterMiss(key, i, e);
        }
2
3
4
5
6
7
8
最后的这个 getEntryAfterMiss() 其实也会将 Entry 中那些 key 指向为空的 value 给清除掉。
同理在 set() 方法中的:
map.set(this, value);
这个 map.set() 方法:
        private void set(ThreadLocal<?> key, Object value) {

            // We don't use a fast path as with get() because it is at
            // least as common to use set() to create new entries as
            // it is to replace existing ones, in which case, a fast
            // path would fail more often than not.

            Entry[] tab = table;
            int len = tab.length;
            int i = key.threadLocalHashCode & (len-1);

            for (Entry e = tab[i];
                 e != null;
                 e = tab[i = nextIndex(i, len)]) {
                ThreadLocal<?> k = e.get();

                if (k == key) {
                    e.value = value;
                    return;
                }

                if (k == null) {
                    replaceStaleEntry(key, value, i);
                    return;
                }
            }

            tab[i] = new Entry(key, value);
            int sz = ++size;
            if (!cleanSomeSlots(i, sz) && sz >= threshold)
                rehash();
        }
2
3
4
5
6
7
8
9
10
11
12
13
14
15
16
17
18
19
20
21
22
23
24
25
26
27
28
29
30
31
32
其中的 replaceStaleEntry() 方法也是起到了同样的效果。
那为什么 get() 和 set() 方法中已经有了可以清除掉 Entry 中不用的 value 了,为什么还需要调用 remove() 方法呢?这是因为 get() 和 set() 中的清除方法并不能保证每一次都能执行得到,即不能及时的释放掉不用的资源,所以还是需要手动调用 remove() 方法。
既然如此麻烦,你有没有想过为什么这个 Entry 中的 ThreadLocal 要定义为 WeakReference 呢?我们来分析一下,如果不定义为 WeakReference 而定义为 强引用 的话,当栈中的 ThreadLocal 被被回收时,Entry 中的 key 指向的 ThreadLocal 永远不会被回收,那么对应的 value 也就不会被回收,除非 ThreadLocalMap 手动被回收,否则内存泄露就是必然发生的事情了。
# (4) ThreadLocal 引发的内存泄露
看下面这段代码:
public class ThreadLocalOOM {

    private static final int TASK_LOOP_SIZE = 500;

    private final static ThreadPoolExecutor poolExecutor = new ThreadPoolExecutor(5, 5,
            1, TimeUnit.MINUTES, new LinkedBlockingQueue<>());

    private static class LocalVariable {
        // 5M大小的数组
        private byte[] a = new byte[1024 * 1024 * 5];
    }

    private final static ThreadLocal<LocalVariable> localVariable = new ThreadLocal<>();

    public static void main(String[] args) throws InterruptedException {
        Object o = new Object();
        for (int i = 0; i < TASK_LOOP_SIZE; ++i) {
            poolExecutor.execute(() -> {
                new LocalVariable();
                System.out.println("use LocalVariable");
            });

            Thread.sleep(100);
        }
        System.out.println("pool execute over");
    }
}
2
3
4
5
6
7
8
9
10
11
12
13
14
15
16
17
18
19
20
21
22
23
24
25
26
27
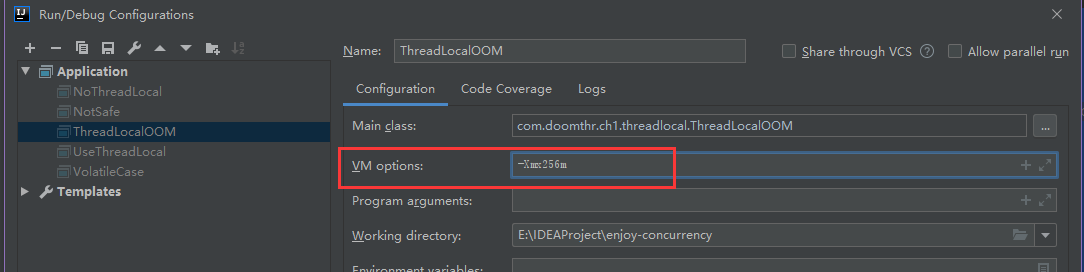
使用线程池最多存放5个线程,启动了500个线程,每个线程制作一件事:申请5m大小的空间。设置应用运行的最大内存为256M:
当运行起来后,使用jdk提供的jvm内存监视器可以看出堆使用空间稳定在25m左右。
修改上面 main() 方法中的代码,使用 ThreadLocal:
    public static void main(String[] args) throws InterruptedException {
        Object o = new Object();
        for (int i = 0; i < TASK_LOOP_SIZE; ++i) {
            poolExecutor.execute(() -> {
                localVariable.set(new LocalVariable());
                System.out.println("use ThreadLocal");
                //localVariable.remove();
            });

            Thread.sleep(100);
        }
        System.out.println("pool execute over");
    }
2
3
4
5
6
7
8
9
10
11
12
13
同样的配置运行后可以看到堆使用空间多了很多,平均在100M左右,最高时能达到200M,这就是 ThreadLocal 引起的内存泄露。
此时将上面注释的 localVariable.remove(); 放开再运行,发现堆使用空间又重新稳定在了25M左右。所以当使用完 ThreadLocal 之后,不要忘记调用 remove() 方法清除掉当前线程中的 ThreadLocalMap 中不使用的key,也就是 ThreadLocal 。
想要更深一步了解 remove() 方法的话,可以看这里:ThreadLocal源码解析
# (5) 错误使用 ThreadLocal 导致线程不安全
看下面这个例子:
public class ThreadLocalUnsafe implements Runnable {

    private static Number number = new Number(0);

    @Override
    public void run() {
        // 每个线程计数加一
        number.setNum(number.getNum() + 1);
        // 将其存储到 ThreadLocal中
        VALUE.set(number);
        SleepTool.ms(2);
        // 输出 number 的值
        System.out.println(Thread.currentThread().getName() + ", number: " + VALUE.get().getNum());
    }

    private static ThreadLocal<Number> VALUE = new ThreadLocal<Number>() {
    };

    public static void main(String[] args) {
        for (int i = 0; i < 5; i++) {
            new Thread(new ThreadLocalUnsafe()).start();
        }
    }

    private static class Number {

        private int num;

        public Number(int num) {
            this.num = num;
        }

        public int getNum() {
            return num;
        }

        public void setNum(int num) {
            this.num = num;
        }

        @Override
        public String toString() {
            return "Number [num=" + num + "]";
        }
    }
}
2
3
4
5
6
7
8
9
10
11
12
13
14
15
16
17
18
19
20
21
22
23
24
25
26
27
28
29
30
31
32
33
34
35
36
37
38
39
40
41
42
43
44
45
46
这里启动了5个线程,每个线程使用 ThreadLocal 存储了 Number 对象,执行结果是什么的?是不是应该是5个线程都输出1呢?
执行结果:
Thread-4, number: 5
Thread-3, number: 5
Thread-1, number: 5
Thread-0, number: 5
Thread-2, number: 5
2
3
4
5
为什么都是5呢,不是每个线程持有自己独立的副本吗?注意观察这里 Number 被定义为了 static ,怪不得,那么每个线程相当于存储都是类中唯一的那个变量,所以加了5次当然值就是5了。要想达到每个线程都是1的效果,只需要去掉 static 修饰就可以了。
# 二、线程间的协作
线程之间相互需要配合,完成某项工作,比如:一个线程修改了一个对象的值, 而另一个线程感知到了变化,然后进行相应的操作,整个过程开始于一个线程, 而最终执行又是另一个线程。前者是生产者,后者就是消费者,这种模式隔离了“做什么”(what)和“怎么做”(How),简单的办法是让消费者线程不断地循环检查变量是否符合预期在 while 循环中设置不满足的条件,如果条件满足则退出 while 循环,从而完成消费者的工作。却存在如下问题: (1) 难以确保及时性。 (2) 难以降低开销。如果降低睡眠的时间,比如休眠1毫秒,这样消费者能更加迅速地发现条件变化,但是却可能消耗更多的处理器资源,造成了无端的浪费。
但其实Java中给我们提供了更为方便的API来使用。
# 1、等待/通知机制
一个线程 A 调用了对象 O 的wait() 方法进入等待状态,而另一个线程 B 调用了对象 O 的 notify() 或者 notifyAll() 方法,线程 A 收到通知后从对象 O 的 wait() 方法返回,进而执行后续操作。上述两个线程通过对象 O 来完成交互,而对象上的 wait() 和 notify/notifyAll() 的关系就如同开关信号一样,用来完成等待方和通知方之间的交互工作。
- notify()
通知一个在对象上等待的线程,使其从 wait() 方法返回继续执行,而返回的前提是该线程获取到了对象的锁,没有获得锁的线程重新进入 WAITING 状态。
- notifyAll()
通知所有等待在该对象上的线程 wait() 调用该方法的线程进入 WAITING 状态,只有等待另外线程的通知或被中断才会返回。需要注意,调用 wait() 方法后,会释放对象的锁。
- wait(long)
超时等待一段时间,这里的参数时间是毫秒,也就是等待长达n毫秒,如果没有通知就超时返回继续执行后面的代码。
- wait(long, int)
对于超时时间更细粒度的控制,可以达到纳秒。
等待方遵循如下原则:
- 获取对象的锁。
- 如果条件不满足,那么调用对象的
wait()方法,被通知后仍要检查条件 - 条件满足则执行对应的逻辑。
伪代码类似下面:
        synchronized (对象) {
            while (条件不满足) {
                对象.wait();
            }
            对应的处理逻辑
        }
2
3
4
5
6
通知方遵循如下原则:
- 获得对象的锁。
- 改变条件。
- 通知所有等待在对象上的线程。
伪代码如下:
        synchronized (对象) {
            改变条件
            对象.notifyAll();
        }
2
3
4
在调用 wait() 、notify() 系列方法之前,线程必须要获得该对象的对象级别锁,即只能在同步方法或同步块中调用 wait() 、notify() 系列方法 。进入 wait() 方法等待后,当前线程释放锁,在从wait() 返回执行前,线程与其他线程准备竞争重新获得锁,执行 notify() 系列方法的线程退出调用了 notify() 系列方法的 synchronized 代码块的时候,线程们就会去竞争锁。如果其中一个线程获得了该对象锁,它就会从 wait() 处继续往下执行,在它退出 synchronized 代码块(或者重新执行到 wait() 处,再次进入 WAITING 状态),释放锁后,其他的已经被唤醒的线程将会继续竞争获取该锁,一直进行下去,直到所有被唤醒的线程都执行完毕。
因为在调用了 notify() 或者 notifyAll() 的时候线程并不会释放锁,而在所在的 synchronized 代码块执行完毕后才会释放锁,所以一般 notify() 或者 notifyAll() 都放在 synchronized 代码块的最后执行。
# notify() 和 notifyAll() 应该用谁
尽可能用 notifyall(),谨慎使用 notify() ,因为 notify() 只会唤醒一个线程,无法确保被唤醒的这个线程一定就是需要唤醒的线程。
下面看应用:
public class Express {

    private final static String CITY = "ShangHai";

    /**
     * 快递运输里程数
     */
    private int km;

    /**
     * 快递到达地点
     */
    private String site;

    public Express() {
    }

    public Express(int km, String site) {
        this.km = km;
        this.site = site;
    }

    /**
     * 变化公里数,然后通知处于 wait 状态并需要处理公里数的线程进行业务处理
     */
    public synchronized void changeKm() {
        km = 101;
        notifyAll();
    }

    /**
     * 变化地点,然后通知处于 wait 状态并需要处理地点的线程进行业务处理
     */
    public synchronized void changeSite() {
        site = "BeiJing";
        notifyAll();
    }

    /**
     * 线程等待公里的变化,当公里数大于等于100的时候,需要修改数据库
     */
    public synchronized void waitKm() {
        while (km < 100) {
            try {
                wait();
                System.out.println("check Site thread[" + Thread.currentThread().getId() + "] has been notified");
            } catch (InterruptedException e) {
                e.printStackTrace();
            }
        }
        System.out.println("km is " + km + ", I will change db");
    }

    /**
     * 线程等待目的地的变化,当地点离开 Shanghai 的时候需要通知用户
     */
    public synchronized void waitSite() {
        while (site.equals(CITY)) {
            try {
                wait();
                System.out.println("Check Site thread[" + Thread.currentThread().getId() + "] has been notified");
            } catch (InterruptedException e) {
                e.printStackTrace();
            }
        }
        System.out.println("site is " + site + ", I will call user");
    }
}
2
3
4
5
6
7
8
9
10
11
12
13
14
15
16
17
18
19
20
21
22
23
24
25
26
27
28
29
30
31
32
33
34
35
36
37
38
39
40
41
42
43
44
45
46
47
48
49
50
51
52
53
54
55
56
57
58
59
60
61
62
63
64
65
66
67
68
首先是快递实体类,注释写的已经很清楚了。
测试类:
public class TestWN {

    private static Express express = new Express(0, Express.CITY);

    /**
     * 检查里程数变化的线程,不满足条件,则线程一直等待
     */
    private static class CheckKm extends Thread {
        @Override
        public void run() {
            express.waitKm();
        }
    }

    /**
     * 检查地点变化的线程,不满足条件,线程一直等待
     */
    private static class CheckSite extends Thread {
        @Override
        public void run() {
            express.waitSite();
        }
    }

    public static void main(String[] args) throws InterruptedException {
        for (int i = 0; i < 3; i++) {
            new CheckSite().start();
        }
        for (int i = 0; i < 3; i++) {
            new CheckKm().start();
        }

        Thread.sleep(1000);
        // 快递地点变化
        express.changeKm();
    }
}
2
3
4
5
6
7
8
9
10
11
12
13
14
15
16
17
18
19
20
21
22
23
24
25
26
27
28
29
30
31
32
33
34
35
36
37
同时启动了3个等待里程变化和地点变化的3个线程,在主线程的最后改变了地点。执行结果:
check Site thread[17] has been notified
km is 101, I will change db
check Site thread[16] has been notified
km is 101, I will change db
check Site thread[15] has been notified
km is 101, I will change db
Check Site thread[14] has been notified
Check Site thread[13] has been notified
Check Site thread[12] has been notified
2
3
4
5
6
7
8
9
可以看出当改变了地点之后,所有的线程都被唤醒了,但是只有真正出发了改变地点逻辑的线程才会执行后面的业务逻辑。
如果修改 changeKm() 方法中的 notifyAll() 为 notify() 的时候,那么只会将在 express 对象上等待的线程中唤醒一个线程,但是那个线程可能并不是我们想要真正处理业务逻辑的线程,这也从另外一个方便说明了,应该多使用 notifyAll() ,而不是 notify() 。
# 2、等待/通知机制的应用--连接池
下面看使用 wait() 和 notifyAll() 实现的一个数据库连接池:
public class DBPool {

    /**
     * 存放连接的容器
     */
    private static LinkedList<Connection> pool = new LinkedList<>();

    /**
     * 初始化连接池
     *
     * @param initialSize 连接池大小
     */
    public DBPool(int initialSize) {
        if (initialSize > 0) {
            for (int i = 0; i < initialSize; i++) {
                pool.addLast(SqlConnectImpl.fetchConnection());
            }
        }
    }

    /**
     * 释放连接,通知其他的等待连接的线程
     *
     * @param connection
     */
    public void releaseConnection(Connection connection) {
        if (connection != null) {
            synchronized (pool) {
                pool.addLast(connection);
                // 通知其他等待连接的线程
                pool.notifyAll();
            }
        }
    }

    /**
     * 获取连接。如果在 mills 内无法获取到连接,将会返回 null
     *
     * @param mills 获取连接最长等待时间
     * @return
     * @throws InterruptedException
     */
    public Connection fetchConnection(long mills) throws InterruptedException {
        synchronized (pool) {
            // 永不超时
            if (mills <= 0) {
                while (pool.isEmpty()) {
                    pool.wait();
                }
                return pool.removeFirst();
            } else {
                // 超时的那一刻
                long future = System.currentTimeMillis() + mills;
                // 还需要等待时长
                long remaining = mills;
                while (pool.isEmpty() && remaining > 0) {
                    pool.wait(remaining);
                    // 唤醒一次,重新计算等待时长
                    remaining = future - System.currentTimeMillis();
                }
                Connection connection = null;
                if (!pool.isEmpty()) {
                    connection = pool.removeFirst();
                }
                return connection;
            }
        }
    }

}
2
3
4
5
6
7
8
9
10
11
12
13
14
15
16
17
18
19
20
21
22
23
24
25
26
27
28
29
30
31
32
33
34
35
36
37
38
39
40
41
42
43
44
45
46
47
48
49
50
51
52
53
54
55
56
57
58
59
60
61
62
63
64
65
66
67
68
69
70
在连接池中定义了一个 LinkedList 用来存放数据库连接,它有一个获取连接和释放连接的方法,当获取连接的方法拿不到连接的时候就会等待,直到超时或者拿到连接了就会返回。
测试类:
public class DBPoolTest {

    private static DBPool pool = new DBPool(10);

    /**
     * 控制 main 线程将会等待所有 Worker 结束后才能继续执行
     */
    private static CountDownLatch end;

    public static void main(String[] args) throws Exception {
        // 线程数量
        int threadCount = 50;
        end = new CountDownLatch(threadCount);
        // 每个线程的操作次数
        int count = 20;
        // 计数器:统计可以拿到连接的线程
        AtomicInteger got = new AtomicInteger();
        // 计数器:统计没有拿到连接的线程
        AtomicInteger notGot = new AtomicInteger();

        for (int i = 0; i < threadCount; i++) {
            Thread thread = new Thread(new Worker(count, got, notGot), "worker_" + i);
            thread.start();
        }
        // main线程在此处等待
        end.await();
        System.out.println("总共尝试的次数:" + (threadCount * count));
        System.out.println("拿到连接的次数:" + got);
        System.out.println("没能连接的次数:" + notGot);
    }

    private static class Worker implements Runnable {

        private int count;
        private AtomicInteger got;
        private AtomicInteger notGot;

        public Worker(int count, AtomicInteger got, AtomicInteger notGot) {
            this.count = count;
            this.got = got;
            this.notGot = notGot;
        }

        public void run() {
            while (count > 0) {
                try {
                    // 从线程池中获取连接,如果1s内无法获取到,将会返回 null
                    // 分别统计连接获取的数量 got 和未获取到的数量 notGot
                    Connection connection = pool.fetchConnection(1000);
                    if (connection != null) {
                        try {
                            connection.createStatement();
                            connection.commit();
                        } finally {
                            pool.releaseConnection(connection);
                            got.incrementAndGet();
                        }
                    } else {
                        notGot.incrementAndGet();
                        System.out.println(Thread.currentThread().getName() + "等待超时!");
                    }
                } catch (Exception ex) {
                } finally {
                    count--;
                }
            }
            end.countDown();
        }
    }
}
2
3
4
5
6
7
8
9
10
11
12
13
14
15
16
17
18
19
20
21
22
23
24
25
26
27
28
29
30
31
32
33
34
35
36
37
38
39
40
41
42
43
44
45
46
47
48
49
50
51
52
53
54
55
56
57
58
59
60
61
62
63
64
65
66
67
68
69
70
在测试中启动了50个线程,每个线程尝试获取连接20次,一部分肯定会获取不到,当超时获取获取到连接了就会返回继续执行。每执行完一个线程 CountDownLatch 就会减1,直到减到0位置,主线程继续执行。
执行结果:
worker_17等待超时!
worker_4等待超时!
worker_11等待超时!
worker_45等待超时!
worker_34等待超时!
...
worker_48等待超时!
worker_19等待超时!
worker_13等待超时!
worker_3等待超时!
worker_29等待超时!
总共尝试的次数:1000
拿到连接的次数:865
没能连接的次数:135
2
3
4
5
6
7
8
9
10
11
12
13
14
另一个例子是模拟枪膛上膛(生产者)、射击(消费者)2个操作:
public class GunChamber {

    private static final int BULLET_SIZE = 20;

    private final LinkedList<Bullet> bulletList = new LinkedList<>();

    private static CountDownLatch countDownLatch = new CountDownLatch(200);

    public GunChamber() {
    }

    /**
     * 子弹上膛
     */
    public void load() throws InterruptedException {
        synchronized (bulletList) {
            while (bulletList.size() == BULLET_SIZE) {
                bulletList.wait();
            }
            bulletList.addLast(new Bullet());
            System.out.println(Thread.currentThread().getName() + ":一发子弹已上膛,剩余子弹:" + bulletList.size());
            bulletList.notifyAll();
        }
    }

    /**
     * 发射子弹
     */
    public void shoot() throws InterruptedException {
        synchronized (bulletList) {
            while (bulletList.isEmpty()) {
                bulletList.wait();
            }
            bulletList.removeFirst();
            System.out.println(Thread.currentThread().getName() + ":发射一发子弹,剩余子弹:" + bulletList.size());
            bulletList.notifyAll();
        }
    }

    private static class LoadRunnable implements Runnable {

        private GunChamber gunChamber;

        public LoadRunnable(GunChamber gunChamber) {
            this.gunChamber = gunChamber;
        }

        @Override
        public void run() {
            try {
                gunChamber.load();
            } catch (InterruptedException e) {
                e.printStackTrace();
            } finally {
                countDownLatch.countDown();
            }
        }
    }

    private static class ShootRunnable implements Runnable {

        private GunChamber gunChamber;

        public ShootRunnable(GunChamber gunChamber) {
            this.gunChamber = gunChamber;
        }

        @Override
        public void run() {
            try {
                gunChamber.shoot();
            } catch (InterruptedException e) {
                e.printStackTrace();
            } finally {
                countDownLatch.countDown();
            }
        }
    }

    private class Bullet {

    }

    public static void main(String[] args) throws InterruptedException {
        GunChamber gunChamber = new GunChamber();

        Thread[] loadThreads = new Thread[100];
        Thread[] shootThreads = new Thread[100];

        for (int i = 0; i < 100; i++) {
            loadThreads[i] = new Thread(new LoadRunnable(gunChamber));
            loadThreads[i].setName("LoadThread_" + i);
            shootThreads[i] = new Thread(new ShootRunnable(gunChamber));
            shootThreads[i].setName("shootThread_" + i);
        }
        for (int i = 0; i < 100; i++) {
            loadThreads[i].start();
            shootThreads[i].start();
        }

        countDownLatch.await();

        System.out.println("执行完毕");
    }
}
2
3
4
5
6
7
8
9
10
11
12
13
14
15
16
17
18
19
20
21
22
23
24
25
26
27
28
29
30
31
32
33
34
35
36
37
38
39
40
41
42
43
44
45
46
47
48
49
50
51
52
53
54
55
56
57
58
59
60
61
62
63
64
65
66
67
68
69
70
71
72
73
74
75
76
77
78
79
80
81
82
83
84
85
86
87
88
89
90
91
92
93
94
95
96
97
98
99
100
101
102
103
104
105
枪膛最大子弹数是20,子弹不满即可以生产子弹上膛;子弹满后等待射击消费子弹。100个线程用来上膛,100个线程用来射击,当没有子弹的时候射击线程等待上膛的线程上膛。直到200个线程都执行完毕,主线程继续。
运行结果:
shootThread_0:发射一发子弹,剩余子弹:1
shootThread_4:发射一发子弹,剩余子弹:0
LoadThread_4:一发子弹已上膛,剩余子弹:1
shootThread_3:发射一发子弹,剩余子弹:0
...
LoadThread_2:一发子弹已上膛,剩余子弹:1
shootThread_1:发射一发子弹,剩余子弹:0
LoadThread_1:一发子弹已上膛,剩余子弹:1
shootThread_87:发射一发子弹,剩余子弹:4
shootThread_83:发射一发子弹,剩余子弹:3
shootThread_99:发射一发子弹,剩余子弹:2
shootThread_98:发射一发子弹,剩余子弹:1
LoadThread_99:一发子弹已上膛,剩余子弹:2
shootThread_97:发射一发子弹,剩余子弹:1
shootThread_96:发射一发子弹,剩余子弹:0
执行完毕
2
3
4
5
6
7
8
9
10
11
12
13
14
15
16
# 3、调用 yield()、sleep()、wait()、notify()等方法对锁的影响
yield() 、 sleep() 被调用后,都不会释放当前线程所持有的锁。
wait() 被调用后,会释放当前线程持有的锁,而且当前被唤醒后,会重新去竞争锁,锁竞争到后才会执行 wait() 方法后面的代码。
notify() 系列方法被调用后,对锁无影响,线程只有在 notify() 系列方法所在的 synchronized 同步代码执行完后才会自然而然的释放锁,所以 notify() 系列方法一般都放在 synchronized 同步代码的最后一行。
下面这个例子充分证明了 sleep() 方法并不会释放当前线程所持有的的锁。
public class SleepLock {

    private Object lock = new Object();

    private class SleepThread extends Thread {

        @Override
        public void run() {
            String threadName = Thread.currentThread().getName();
            System.out.println(threadName + " is read to take the lock");
            try {
                synchronized (lock) {
                    System.out.println(threadName + " token the lock");
                    Thread.sleep(5000);
                    System.out.println(threadName + " finish the work: ");
                }
            } catch (InterruptedException e) {
                e.printStackTrace();
            }
        }
    }

    private class NotSleepThread extends Thread {

        @Override
        public void run() {
            String threadName = Thread.currentThread().getName();
            System.out.println(threadName + " is ready to take the lock");
            synchronized (lock) {
                System.out.println(threadName + " token the lock");
                System.out.println(threadName + " finish the work");
            }
        }
    }

    public static void main(String[] args) {
        SleepLock sleepTest = new SleepLock();

        Thread threadA = sleepTest.new SleepThread();
        threadA.setName("SleepThread");
        Thread threadB = sleepTest.new NotSleepThread();
        threadB.setName("NotSleepThread");

        threadA.start();
        try {
            System.out.println(" Main slept!");
            Thread.sleep(1000);
        } catch (InterruptedException e) {
            e.printStackTrace();
        }
        threadB.start();
    }

}
2
3
4
5
6
7
8
9
10
11
12
13
14
15
16
17
18
19
20
21
22
23
24
25
26
27
28
29
30
31
32
33
34
35
36
37
38
39
40
41
42
43
44
45
46
47
48
49
50
51
52
53
54
55
运行结果:
 Main slept!
SleepThread is read to take the lock
SleepThread token the lock
NotSleepThread is ready to take the lock
SleepThread finish the work
NotSleepThread token the lock
NotSleepThread finish the work
2
3
4
5
6
7