# Java8新增的并发
# 一、原子操作CAS
# 1、LongAdder
JDK1.8 时,java.util.concurrent.atomic 包中提供了一个新的原子类:LongAdder。根据 Oracle 官方文档的介绍,LongAdder 在高并发的场景下会比它的前辈————AtomicLong 具有更好的性能,代价是消耗更多的内存空间。
下面看一性能测试代码:
public class LongAdderDemo {

    private static final int MAX_THREADS = 20;
    private static final int TASK_COUNT = 400;
    private static final int TARGET_COUNT = 100000000;

    /**
     * 三个不同类型的long有关的变量
     */
    private long syncCount = 0;
    private AtomicLong atomicCount = new AtomicLong(0L);
    private LongAdder adderCount = new LongAdder();

    /**
     * 控制线程同时进行
     */
    private static CountDownLatch syncLatch = new CountDownLatch(TASK_COUNT);
    private static CountDownLatch atomicLatch = new CountDownLatch(TASK_COUNT);
    private static CountDownLatch adderLatch = new CountDownLatch(TASK_COUNT);

    /**
     * 普通 long 的同步锁测试方法
     *
     * @return
     */
    protected synchronized long increment() {
        return ++syncCount;
    }

    protected synchronized long getSyncCount() {
        return syncCount;
    }

    /**
     * 普通 long 的同步锁测试任务
     */
    private class SyncTask implements Runnable {

        private long startTime;
        private LongAdderDemo out;

        public SyncTask(long startTime, LongAdderDemo out) {
            this.startTime = startTime;
            this.out = out;
        }

        @Override
        public void run() {
            long v = out.getSyncCount();
            while (v < TARGET_COUNT) {
                v = out.increment();
            }
            long endTime = System.currentTimeMillis();
            System.out.println("SyncTask spend:" + (endTime - startTime) + "ms");
            syncLatch.countDown();
        }
    }

    /**
     * 原子型 long 的测试任务
     */
    private class AtomicTask implements Runnable {

        private long startTime;

        public AtomicTask(long startTime) {
            this.startTime = startTime;
        }

        @Override
        public void run() {
            long v = atomicCount.get();
            while (v < TARGET_COUNT) {
                v = atomicCount.incrementAndGet();
            }
            long endTime = System.currentTimeMillis();
            System.out.println("AtomicTask spend:" + (endTime - startTime) + "ms");
            atomicLatch.countDown();
        }
    }

    /**
     * LongAdder 的测试任务
     */
    private class LongAdderTask implements Runnable {

        private long startTime;

        public LongAdderTask(long startTime) {
            this.startTime = startTime;
        }

        @Override
        public void run() {
            long v = adderCount.sum();
            while (v < TARGET_COUNT) {
                adderCount.increment();
                v = adderCount.sum();
            }
            long endTime = System.currentTimeMillis();
            System.out.println("LongAdderTask spend:" + (endTime - startTime) + "ms");
            adderLatch.countDown();
        }
    }

    /**
     * 普通 long 的执行同步锁测试
     *
     * @throws InterruptedException
     */
    public void testSync() throws InterruptedException {
        ExecutorService exe = Executors.newFixedThreadPool(MAX_THREADS);
        long startTime = System.currentTimeMillis();
        SyncTask sync = new SyncTask(startTime, this);
        for (int i = 0; i < TASK_COUNT; i++) {
            exe.submit(sync);
        }
        syncLatch.await();
        exe.shutdown();
    }


    /**
     * 原子型 long 的执行测试
     *
     * @throws InterruptedException
     */
    public void testAtomic() throws InterruptedException {
        ExecutorService exe = Executors.newFixedThreadPool(MAX_THREADS);
        long startTime = System.currentTimeMillis();
        AtomicTask atomic = new AtomicTask(startTime);
        for (int i = 0; i < TASK_COUNT; i++) {
            exe.submit(atomic);
        }
        atomicLatch.await();
        exe.shutdown();
    }

    /**
     * LongAdder 的执行测试
     *
     * @throws InterruptedException
     */
    public void testLongAdder() throws InterruptedException {
        ExecutorService exe = Executors.newFixedThreadPool(MAX_THREADS);
        long startTime = System.currentTimeMillis();
        LongAdderTask longAdderTask = new LongAdderTask(startTime);
        for (int i = 0; i < TASK_COUNT; i++) {
            exe.submit(longAdderTask);
        }
        adderLatch.await();
        exe.shutdown();
    }

    public static void main(String[] args) throws InterruptedException {
        LongAdderDemo demo = new LongAdderDemo();
        demo.testSync();
        demo.testAtomic();
        demo.testLongAdder();
    }
}
2
3
4
5
6
7
8
9
10
11
12
13
14
15
16
17
18
19
20
21
22
23
24
25
26
27
28
29
30
31
32
33
34
35
36
37
38
39
40
41
42
43
44
45
46
47
48
49
50
51
52
53
54
55
56
57
58
59
60
61
62
63
64
65
66
67
68
69
70
71
72
73
74
75
76
77
78
79
80
81
82
83
84
85
86
87
88
89
90
91
92
93
94
95
96
97
98
99
100
101
102
103
104
105
106
107
108
109
110
111
112
113
114
115
116
117
118
119
120
121
122
123
124
125
126
127
128
129
130
131
132
133
134
135
136
137
138
139
140
141
142
143
144
145
146
147
148
149
150
151
152
153
154
155
156
157
158
159
160
161
注意这里的 TARGET_COUNT 给的值是100000000,这个值要达到一定程度才能体现出 LongAdder 的性能来。执行结果:
SyncTask spend:2983ms
...
SyncTask spend:2983ms
AtomicTask spend:2150ms
...
AtomicTask spend:2159ms
LongAdderTask spend:1838ms
...
LongAdderTask spend:1838ms
2
3
4
5
6
7
8
9
可以看出使用 LongAdder 花费的时间要更短些。
AtomicLong 是利用了底层的 CAS 操作来提供并发性的,调用了 Unsafe 类的 getAndAddLong() 方法,该方法是个 native 方法,它的逻辑是采用自旋的方式不断更新目标值,直到更新成功。
在并发量较低的环境下,线程冲突的概率比较小,自旋的次数不会很多。但是,高并发环境下,N 个线程同时进行自旋操作,会出现大量失败并不断自旋的情况,此时 AtomicLong 的自旋会成为瓶颈。
这就是 LongAdder 引入的初衷——解决高并发环境下 AtomicLong 的自旋瓶颈问题。
AtomicLong 中有个内部变量 value 保存着实际的 long 值,如下:
private volatile long value;
AtomicLong 的所有的操作都是针对该变量进行。也就是说,高并发环境下,value 变量其实是一个热点,也就是 N 个线程竞争一个热点。
LongAdder 的基本思路就是分散热点,将 value 值分散到一个数组中,不同线程会命中到数组的不同槽中,各个线程只对自己槽中的那个值进行 CAS 操作,这样热点就被分散了,冲突的概率就小很多。如果要获取真正的 long 值,只要将各个槽中的变量值累加返回。
这种做法和 ConcurrentHashMap 中的“分段锁”其实就是类似的思路。
LongAdder 提供的 API 和 AtomicLong 比较接近,两者都能以原子的方式对 long 型变量进行增减。
但是 AtomicLong 提供的功能其实更丰富,尤其是 addAndGet()、 decrementAndGet()、compareAndSet() 这些方法。 addAndGet()、 decrementAndGet() 除了单纯的做自增自减外,还可以立即获取增减后的值,而 LongAdder 则需要做同步控制才能精确获取增减后的值。如果业务需求需要精确的控制计数,做计数比较,AtomicLong 也更合适。
另外,从空间方面考虑,LongAdder 其实是一种“空间换时间”的思想,从这一点来讲 AtomicLong 更适合。
总之,低并发、一般的业务场景下 AtomicLong 是足够了。如果并发量很多,存在大量写多读少的情况,那 LongAdder 可能更合适。适合的才是最好的,如果真出现了需要考虑到底用 AtomicLong 好还是 LongAdder 的业务场景,那么这样的讨论是没有意义的,因为这种情况下要么进行性能测试,以准确评估在当前业务场景下两者的性能,要么换个思路寻求其它解决方案。对于 LongAdder 来说,内部有一个 base 变量,一个 Cell[] 数组。
    /**
     * Table of cells. When non-null, size is a power of 2.
     */
    transient volatile Cell[] cells;

    /**
     * Base value, used mainly when there is no contention, but also as
     * a fallback during table initialization races. Updated via CAS.
     */
    transient volatile long base;
2
3
4
5
6
7
8
9
10
base 变量:非竞态条件下,直接累加到该变量上。
Cell[]数组:竞态条件下,累加个各个线程自己的槽 Cell[i]中。
所以,最终结果的计算应该该是:
    public long sum() {
        Cell[] as = cells; Cell a;
        long sum = base;
        if (as != null) {
            for (int i = 0; i < as.length; ++i) {
                if ((a = as[i]) != null)
                    sum += a.value;
            }
        }
        return sum;
    }
2
3
4
5
6
7
8
9
10
11
在实际运用的时候,只有从未出现过并发冲突的时候,base 基数才会使用到,一旦出现了并发冲突,之后所有的操作都只针对 Cell[] 数组中的单元 Cell。
    public void add(long x) {
        Cell[] as; long b, v; int m; Cell a;
        if ((as = cells) != null || !casBase(b = base, b + x)) {
            boolean uncontended = true;
            if (as == null || (m = as.length - 1) < 0 ||
                (a = as[getProbe() & m]) == null ||
                !(uncontended = a.cas(v = a.value, v + x)))
                longAccumulate(x, null, uncontended);
        }
    }
2
3
4
5
6
7
8
9
10
而 LongAdder 最终结果的求和,并没有使用全局锁,返回值不是绝对准确的,因为调用这个方法时还有其他线程可能正在进行计数累加,所以只能得到某个时刻的近似值,这也就是 LongAdder 并不能完全替代 LongAtomic 的原因之一。
而且从测试情况来看,线程数越多,并发操作数越大,LongAdder 的优势越大,线程数较小时,AtomicLong 的性能还超过了 LongAdder。
# 2、其他新增
除了新引入 LongAdder 外,还有引入了它的三个兄弟类:LongAccumulator、DoubleAdder、DoubleAccumulator。
LongAccumulator 是 LongAdder 的增强版。LongAdder 只能针对数值的进行加减运算,而 LongAccumulator 提供了自定义的函数操作。
通过 LongBinaryOperator,可以自定义对入参的任意操作,并返回结果(LongBinaryOperator 接收 2 个 long 作为参数,并返回 1 个 long)。
LongAccumulator 内部原理和 LongAdder 几乎完全一样。
DoubleAdder 和 DoubleAccumulator 用于操作 double 原始类型。
# 二、StampLock
StampedLock 是 Java8 引入的一种新的所机制,简单的理解,可以认为它是读写锁的一个改进版本,读写锁虽然分离了读和写的功能,使得读与读之间可以完全并发,但是读和写之间依然是冲突的,读锁会完全阻塞写锁,它使用的依然是悲观的锁策略。如果有大量的读线程,他也有可能引起写线程的饥饿。
而 StampedLock 则提供了一种乐观的读策略,这种乐观策略的锁非常类似于无锁的操作,使得乐观锁完全不会阻塞写线程。
它的思想是读写锁中读不仅不阻塞读,同时也不应该阻塞写。
读不阻塞写的实现思路:在读的时候如果发生了写,则应当重读而不是在读的时候直接阻塞写!即读写之间不会阻塞对方,但是写和写之间还是阻塞的!
StampedLock 的内部实现是基于 CLH 的。
使用示例:
public class StampedLockDemo {

    /**
     * 一个点的x,y坐标
     */
    private double x, y;

    /**
     * Stamped 类似一个时间戳的作用,每次写的时候对其 +1 来改变被操作对象的 Stamped 值
     * 这样其它线程读的时候发现目标对象的 Stamped 改变,则执行重读
     */
    private final StampedLock stampedLock = new StampedLock();

    /**
     * 写锁(排它锁)
     *
     * @param deltaX
     * @param deltaY
     */
    private void move(double deltaX, double deltaY) {
        // stampedLock 调用 writeLock 和 unlockWrite 时候都会导致 stampedLock 的 stamp 值的变化
        // 即每次+1,直到加到最大值,然后从0重新开始
        // 写锁
        long stamp = stampedLock.writeLock();
        try {
            x += deltaX;
            y += deltaY;
        } finally {
            // 释放写锁
            stampedLock.unlockWrite(stamp);
        }
    }

    /**
     * 乐观读锁
     *
     * @return
     */
    private double distanceFromOrigin() {
        // tryOptimisticRead 是一个乐观的读,使用这种锁的读不阻塞写
        // 每次读的时候得到一个当前的 stamp 值(类似时间戳的作用)
        long stamp = stampedLock.tryOptimisticRead();
        // 这里就是读操作,读取 x 和 y,因为读取 x 时,y 可能被写了新的值,所以下面需要判断
        double currentX = x, currentY = y;
        // 如果读取的时候发生了写,则 stampedLock 的 stamp 属性值会变化,此时需要重读,
        // validate():比较当前 stamp 和获取乐观锁得到的 stamp 比较,不一致则失败。
        // 再重读的时候需要加读锁(并且重读时使用的应当是悲观的读锁,即阻塞写的读锁)
        // 当然重读的时候还可以使用 tryOptimisticRead,此时需要结合循环了,即类似 CAS 方式
        // 读锁又重新返回一个 stamp 值
        // 如果验证失败(读之前已发生写)
        if (!stampedLock.validate(stamp)) {
            // 悲观读锁
            stamp = stampedLock.readLock();
            try {
                currentX = x;
                currentY = y;
            } finally {
                // 释放读锁
                stampedLock.unlockRead(stamp);
            }
        }
        // 读锁验证成功后执行计算,即读的时候没有发生写
        return Math.sqrt(currentX * currentX + currentY * currentY);
    }

    /**
     * 读锁升级为写锁
     *
     * @param newX
     * @param newY
     */
    void moveIfAtOrigin(double newX, double newY) { // upgrade
        // 读锁(这里可用乐观锁替代)
        long stamp = stampedLock.readLock();
        try {
            // 循环,检查当前状态是否符合
            while (x == 0.0 && y == 0.0) {
                long ws = stampedLock.tryConvertToWriteLock(stamp);
                // 如果写锁成功
                if (ws != 0L) {
                    // 替换stamp为写锁戳
                    stamp = ws;
                    // 修改数据
                    x = newX;
                    y = newY;
                    break;
                }
                // 转换为写锁失败
                else {
                    // 释放读锁
                    stampedLock.unlockRead(stamp);
                    // 获取写锁(必要情况下阻塞一直到获取写锁成功)
                    stamp = stampedLock.writeLock();
                }
            }
        } finally {
            // 释放锁(可能是读/写锁)
            stampedLock.unlock(stamp);
        }
    }
}
2
3
4
5
6
7
8
9
10
11
12
13
14
15
16
17
18
19
20
21
22
23
24
25
26
27
28
29
30
31
32
33
34
35
36
37
38
39
40
41
42
43
44
45
46
47
48
49
50
51
52
53
54
55
56
57
58
59
60
61
62
63
64
65
66
67
68
69
70
71
72
73
74
75
76
77
78
79
80
81
82
83
84
85
86
87
88
89
90
91
92
93
94
95
96
97
98
99
100
101
# 三、CompleteableFuture
# 1、Future 的不足
Future 是 Java5 添加的类,用来描述一个异步计算的结果。你可以使用 isDone() 方法检查计算是否完成,或者使用 get() 阻塞住调用线程,直到计算完成返回结果,你也可以使用 cancel() 方法停止任务的执行。
虽然 Future 以及相关使用方法提供了异步执行任务的能力,但是对于结果的获取却是很不方便,只能通过阻塞或者轮询的方式得到任务的结果。阻塞的方式显然和我们的异步编程的初衷相违背,轮询的方式又会耗费无谓的 CPU 资源,而且也不能及时地得到计算结果,为什么不能用观察者设计模式当计算结果完成及时通知监听者呢?
Java 的一些框架,比如 Netty,自己扩展了 Java 的 Future 接口,提供了 addListener() 等多个扩展方法,Google guava 也提供了通用的扩展 Future :ListenableFuture、SettableFuture 以及辅助类 Futures 等,方便异步编程。
同时 Future 接口很难直接表述多个 Future 结果之间的依赖性。实际开发中,我们经常需要达成以下目的:
将两个异步计算合并为一个——这两个异步计算之间相互独立,同时第二个又依赖于第一个的结果。
等待
Future集合中的所有任务都完成。仅等待
Future集合中最快结束的任务完成(有可能因为它们试图通过不同的方式计算同一个值),并返回它的结果。应对
Future的完成事件(即当Future的完成事件发生时会收到通知,并能使用Future计算的结果进行下一步的操作,不只是简单地阻塞等待操作的结果)
# 2、CompleteableFuture
JDK1.8 新加入的一个实现类 CompletableFuture,实现了 Future<T>,CompletionStage<T> 两个接口。实现了 Future 接口,意味着可以像以前一样通过阻塞或者轮询的方式获得结果。
# (1) 创建
除了直接 new 出一个 CompletableFuture 的实例,还可以通过工厂方法创建 CompletableFuture 的实例。
# 工厂方法
- runAsync(runnable): CompletableFuture
- runAsync(Runnable, Executor): CompletableFuture
- supplyAsync(Supplier): CompletableFuture
- supplyAsync(Supplier, Executor): CompletableFuture
Asynsc 表示异步,而 supplyAsync 与 runAsync 不同在与前者异步返回一个结果, 后者是返回值是 void,第二个函数第二个参数表示是用我们自己创建的线程池,否则采用默认的 ForkJoinPool.commonPool() 作为它的线程池。
# 获得结果的方法
- public T get()
- public T get(long timeout, TimeUnit unit)
- public T getNow(T valueIfAbsent)
- public T join()
getNow() 有点特殊,如果结果已经计算完则返回结果或者抛出异常,否则返回给定的valueIfAbsent值。join()返回计算的结果或者抛出一个unchecked异常(CompletionException),它和get()` 对抛出的异常的处理有些细微的区别。
CompletableFuture 的使用范例:
public class CFDemo {

    private static class GetResult extends Thread {

        CompletableFuture<Integer> f;

        GetResult(String threadName, CompletableFuture<Integer> f) {
            super(threadName);
            this.f = f;
        }

        @Override
        public void run() {
            try {
                System.out.println("waiting result.....");
                System.out.println(getName() + ": " + f.get());
            } catch (InterruptedException e) {
                e.printStackTrace();
            } catch (ExecutionException e) {
                e.printStackTrace();
            }
        }
    }

    public static void main(String[] args) throws Exception {
        final CompletableFuture<Integer> f = new CompletableFuture<>();

        new GetResult("Client1", f).start();
        new GetResult("Client2", f).start();
        System.out.println("sleeping");
        SleepTool.second(2);
        f.complete(100);
    }
}
2
3
4
5
6
7
8
9
10
11
12
13
14
15
16
17
18
19
20
21
22
23
24
25
26
27
28
29
30
31
32
33
34
执行结果:
sleeping
waiting result.....
waiting result.....
Client2: 100
Client1: 100
2
3
4
5
如果将最后的 complete() 方法替换为抛出异常的方法:
f.completeExceptionally(new Exception());
此时的执行结果:
sleeping
waiting result.....
waiting result.....
java.util.concurrent.ExecutionException: java.lang.Exception
	at java.util.concurrent.CompletableFuture.reportGet(CompletableFuture.java:357)
	at java.util.concurrent.CompletableFuture.get(CompletableFuture.java:1895)
	at com.jerry.ch10.cfdemo.CFDemo$GetResult.run(CFDemo.java:30)
Caused by: java.lang.Exception
	at com.jerry.ch10.cfdemo.CFDemo.main(CFDemo.java:47)
2
3
4
5
6
7
8
9
10
11
12
13
14
15
# 辅助方法
- public static CompletableFuture
allOf(CompletableFuture<?>... cfs) - public static CompletableFuture
allOf() 方法是当所有的 CompletableFuture 都执行完后执行计算。
anyOf() 方法是当任意一个 CompletableFuture 执行完后就会执行计算,计算的结果相同。
public class AllOfAnyOf {

    public static void main(String[] args) throws ExecutionException, InterruptedException {
        Random rand = new Random();

        CompletableFuture<Integer> future1 = CompletableFuture.supplyAsync(() -> {
            try {
                Thread.sleep(1000 + rand.nextInt(1000));
            } catch (InterruptedException e) {
                e.printStackTrace();
            }
            System.out.println("future1完成");
            return 100;
        });

        CompletableFuture<String> future2 = CompletableFuture.supplyAsync(() -> {
            try {
                Thread.sleep(2000 + rand.nextInt(1000));
            } catch (InterruptedException e) {
                e.printStackTrace();
            }
            System.out.println("future2完成");
            return "abc";
        });

        CompletableFuture<String> future3 = CompletableFuture.supplyAsync(() -> {
            try {
                Thread.sleep(3000 + rand.nextInt(1000));
            } catch (InterruptedException e) {
                e.printStackTrace();
            }
            System.out.println("future3完成");
            return "123abc";
        });

        CompletableFuture.allOf(future1, future2, future3).thenRun(() -> {
            System.out.println("All done!");
        });

        SleepTool.second(5);
    }
}
2
3
4
5
6
7
8
9
10
11
12
13
14
15
16
17
18
19
20
21
22
23
24
25
26
27
28
29
30
31
32
33
34
35
36
37
38
39
40
41
42
执行结果:
future1完成
future2完成
future3完成
All done!
2
3
4
如果替换为使用 anyOf() 方法:
        CompletableFuture<Object> f = CompletableFuture.anyOf(future1, future2, future3);
        System.out.println(f.get());
2
执行结果:
future1完成
100
future2完成
future3完成
2
3
4
CompletionStage 是一个接口,从命名上看得知是一个完成的阶段,它代表了一个特定的计算的阶段,可以同步或者异步的被完成。你可以把它看成一个计算流水线上的一个单元,并最终会产生一个最终结果,这意味着几个 CompletionStage 可以串联起来,一个完成的阶段可以触发下一阶段的执行,接着触发下一次,再接着触发下一次………
总结 CompletableFuture 几个关键点:
计算可以由
Future,Consumer或者Runnable接口中的apply()、accept()或者run()等方法表示。计算的执行主要有以下
- 默认执行
- 使用默认的
CompletionStage的异步执行提供者异步执行。这些方法名使用someActionAsync这种格式表示。 - 使用
Executor提供者异步执行。这些方法同样也是someActionAsync这种格式,但是会增加一个Executor参数。
CompletableFuture 里大约有五十种方法,但是可以进行归类。
# 变换类 thenApply
- thenApply(Function<? super T, ? extends U>)
- thenApplyAsync(Function<? super T, ? extends U>)
- thenApplyAsync(Function<? super T, ? extends U>, Executor)
关键入参是函数式接口 Function。它的入参是上一个阶段计算后的结果,返回值是经过转化后结果。
public class ThenApply {

    public static void main(String[] args) {
        String result = CompletableFuture.supplyAsync(() -> "hello")
                .thenApply(s -> s + " world").join();
        System.out.println(result);
    }
}
2
3
4
5
6
7
8
执行结果:
hello world
# 消费类 thenAccept
- thenAccept(Consumer<? super T>)
- thenAcceptAsync(Consumer<? super T>)
- thenAcceptAsync(Consumer<? super T>, Executor)
关键入参是函数式接口 Consumer。它的入参是上一个阶段计算后的结果,没有返回值。
public class ThenAccept {

    public static void main(String[] args) {
        CompletableFuture.supplyAsync(() -> "hello").thenAccept(s -> System.out.println(s + " world"));
    }
}
2
3
4
5
6
执行结果:
hello world
# 执行操作类 thenRun
- thenRun(Runnable)
- thenRunAsync(Runnable)
- thenRunAsync(Runnable, Executor)
对上一步的计算结果不关心,执行下一个操作,入参是一个 Runnable 的实例,表示上一步完成后执行的操作。
public class ThenRun {

    public static void main(String[] args) {
        CompletableFuture.supplyAsync(() -> {
            SleepTool.second(1);
            System.out.println("hello");
            return "hello";
        }).thenRun(() -> System.out.println("hello world"));
        SleepTool.second(2);
    }
}
2
3
4
5
6
7
8
9
10
11
执行结果:
hello
hello world
2
# 结合转化类
- thenCombine(CompletionStage<? extends U> BiFunction<? super T, ? super U, ? extends V>)
- thenCombineAsync(CompletionStage<? extends U>, BiFunction<? super T, ? super U, ? extends V)
- thenCombineAsync(CompletionStage<? extends U>, BiFunction<? super T, ? super U, ? extends V, Executor)
需要上一步的处理返回值,并且参数 other 代表的 CompletionStage 有返回值之后,利用这两个返回值,进行转换后返回指定类型的值。
两个 CompletionStage 是并行执行的,它们之间并没有先后依赖顺序,other 并不会等待先前的 CompletableFuture 执行完毕后再执行。
public class ThenCombine {

    public static void main(String[] args) {
        String result = CompletableFuture.supplyAsync(() -> {
            SleepTool.second(2);
            return "hello";
        }).thenCombine(CompletableFuture.supplyAsync(() -> {
            SleepTool.second(1);
            return "world";
        }), (s1, s2) -> s1 + " " + s2).join();
        System.out.println(result);
    }
}
2
3
4
5
6
7
8
9
10
11
12
13
执行结果:
hello world
- thenCompose(Function<? super T, ? extends CompletionStage>)
- thenComposeAsync(Function<? super T, ? extends CompletionStage>)
- thenComposeAsync(Function<? super T, ? extends CompletionStage>, Executor)
对于 Compose 可以连接两个 CompletableFuture,其内部处理逻辑是当第一个 CompletableFuture 处理没有完成时会合并成一个 CompletableFuture,如果处理完成,第二个 future 会紧接上一个 CompletableFuture 进行处理。
第一个 CompletableFuture 的处理结果是第二个 future 需要的输入参数。
public class ThenCompose {

    public static void main(String[] args) {
        Integer result = CompletableFuture
                .supplyAsync(() -> 10)
                .thenCompose(i -> CompletableFuture.supplyAsync(() -> i + 1))
                .join();
        System.out.println(result);
    }
}
2
3
4
5
6
7
8
9
10
执行结果:
11
# 结合转化类
- thenAcceptBoth(CompletionStage<? extends U>, BiConsumer<? super T, ? super U>)
- thenAcceptBothAsync(CompletionStage<? extends U>, BiConsumer<? super T, ? super U>)
- thenAcceptBothAsync(CompletionStage<? extends U>, BiConsumer<? super T, ? super U>, Executor)
需要上一步的处理返回值,并且 other 代表的 CompletionStage 有返回值之后,利用这两个返回值,进行消费。
public class ThenAcceptBoth {

    public static void main(String[] args) {
        CompletableFuture.supplyAsync(() -> {
            SleepTool.second(1);
            System.out.println("hello");
            return "hello";
        }).thenAcceptBoth(CompletableFuture.supplyAsync(() -> {
            SleepTool.second(2);
            System.out.println("world");
            return "world";
        }), (s1, s2) -> System.out.println(s1 + " " + s2));
        SleepTool.second(3);
    }
}
2
3
4
5
6
7
8
9
10
11
12
13
14
15
执行结果:
hello
world
hello world
2
3
# 运行后执行类
- runAfterBoth(CompletionStage<?>, Runnable)
- runAfterBothAsync(CompletionStage<?>, Runnable)
- runAfterBothAsync(CompletionStage<?>, Runnable, Executor)
不关心这两个 CompletionStage 的结果,只关心这两个 CompletionStage 都执行完毕,之后再进行操作(Runnable)。
public class RunAfterBoth {

    public static void main(String[] args) {
        CompletableFuture.supplyAsync(() -> {
            SleepTool.second(1);
            System.out.println("s1");
            return "s1";
        }).runAfterBothAsync(CompletableFuture.supplyAsync(() -> {
            SleepTool.second(2);
            System.out.println("s2");
            return "s2";
        }), () -> System.out.println("hello world"));
        SleepTool.second(3);
    }
}
2
3
4
5
6
7
8
9
10
11
12
13
14
15
执行结果:
s1
s2
hello world
2
3
# 取最快运行后执行类
- runAfterEither(CompletionStage<?>, Runnable)
- runAfterEitherAsync(CompletionStage<?>, Runnable)
- runAfterEitherAsyncAsync(CompletionStage<?>, Runnable, Executor)
两个 CompletionStage,任何一个完成了都会执行下一步的操作(Runnable)。
public class RunAfterEither {

    public static void main(String[] args) {
        CompletableFuture.supplyAsync(() -> {
            SleepTool.second(2);
            System.out.println("s1");
            return "s1";
        }).runAfterEither(CompletableFuture.supplyAsync(() -> {
            SleepTool.second(1);
            System.out.println("s2");
            return "s2";
        }), () -> System.out.println("hello world"));
        SleepTool.second(3);
    }
}
2
3
4
5
6
7
8
9
10
11
12
13
14
15
执行结果:
s2
hello world
s1
2
3
# 取最快转换类
- applyToEither(CompletionStage<? extends T>, Function<? super T, U>)
- applyToEitherAsync(CompletionStage<? extends T>, Function<? super T, U>)
- applyToEitherAsync(CompletionStage<? extends T>, Function<? super T, U>, Executor)
两个 CompletionStage,谁计算的快,我就用那个 CompletionStage 的结果进行下一步的转化操作。现实开发场景中,总会碰到有两种渠道完成同一个事情,所以就可以调用这个方法,找一个最快的结果进行处理。
public class ApplyToEither {

    public static void main(String[] args) {
        String result = CompletableFuture.supplyAsync(() -> {
            SleepTool.second(1);
            System.out.println("s1");
            return "s1";
        }).applyToEither(CompletableFuture.supplyAsync(() -> {
            SleepTool.second(2);
            System.out.println("hello world");
            return "hello world";
        }), s -> s).join();
        System.out.println(result);
    }
}
2
3
4
5
6
7
8
9
10
11
12
13
14
15
执行结果:
s1
s1
2
# 取最快消费类
- acceptEither(CompletionStage<? extends T>, Consumer<? super T>)
- acceptEitherAsync(CompletionStage<? extends T>, Consumer<? super T>)
- acceptEitherAsync(CompletionStage<? extends T>, Consumer<? super T>, Executor)
两个 CompletionStage,谁计算的快,我就用那个 CompletionStage 的结果进行下一步的消费操作。
public class AcceptEither {

    public static void main(String[] args) {
        CompletableFuture.supplyAsync(() -> {
            SleepTool.second(1);
            System.out.println("s1");
            return "s1";
        }).acceptEither(CompletableFuture.supplyAsync(() -> {
            SleepTool.second(2);
            System.out.println("hello world");
            return "hello world";
        }), (s) -> System.out.println(s));
        SleepTool.second(3);
    }
}
2
3
4
5
6
7
8
9
10
11
12
13
14
15
执行结果:
s1
s1
hello world
2
3
# 异常补偿类
- exceptionally(Function<Throwable, ? extends T>)
当运行时出现了异常,可以通过 exceptionally() 进行补偿。
public class Exceptionally {

    public static void main(String[] args) {
        String result = CompletableFuture.supplyAsync(() -> {
            SleepTool.second(1);
            if (1 == 1) {
                throw new RuntimeException("测试一下异常情况");
            }
            return "s1";
        }).exceptionally(e -> {
            System.out.println(e.getMessage());
            return "hello world";
        }).join();
        System.out.println(result);
    }
}
2
3
4
5
6
7
8
9
10
11
12
13
14
15
16
执行结果:
java.lang.RuntimeException: 测试一下异常情况
hello world
2
如果改变为不抛出异常的代码 if (1 != 2) 后,执行结果:
s1
# 运行后记录结果类
- whenComplete(BiConsumer<? super T, ? super Throwable>)
- whenCompleteAsync(BiConsumer<? super T, ? super Throwable>)
- whenCompleteAsync(BiConsumer<? super T, ? super Throwable>, Executor)
BiConsumer 执行完毕后它的结果返回原始的 CompletableFuture 的计算结果或者返回异常。所以不会对结果产生任何的作用。
public class WhenComplete {

    public static void main(String[] args) {
        String result = CompletableFuture.supplyAsync(() -> {
            SleepTool.second(1);
            if (1 == 1) {
                throw new RuntimeException("测试一下异常情况");
            }
            return "s1";
        }).whenComplete((s, t) -> {
            System.out.println(s);
            System.out.println(t);
            System.out.println(t.getMessage());
        }).exceptionally(e -> {
            System.out.println(e.getMessage());
            return "hello world";
        }).join();
        System.out.println(result);
    }
}
2
3
4
5
6
7
8
9
10
11
12
13
14
15
16
17
18
19
20
执行结果:
null
java.util.concurrent.CompletionException: java.lang.RuntimeException: 测试一下异常情况
java.lang.RuntimeException: 测试一下异常情况
java.lang.RuntimeException: 测试一下异常情况
hello world
2
3
4
5
如果改变为不抛出异常的代码 if (1 != 2) 后,执行结果:
s1
null
java.lang.NullPointerException
hello world
2
3
4
# 运行后处理结果类
- handle(BiFunction<? super T, Throwable, ? extends U>)
- handleAsync(BiFunction<? super T, Throwable, ? extends U>)
- handleAsync(BiFunction<? super T, Throwable, ? extends U>, Executor)
运行完成时,对结果的处理。这里的完成时有两种情况,一种是正常执行,返回值。另外一种是遇到异常抛出造成程序的中断。
public class Handle {

    public static void main(String[] args) {

        // 出现异常时
        String result = CompletableFuture.supplyAsync(() -> {
            SleepTool.second(1);
            // 出现异常
            if (1 == 1) {
                throw new RuntimeException("测试一下异常情况");
            }
            return "s1";
        }).handle((s, t) -> {
            if (t != null) {
                return "hello world";
            }
            return s;
        }).join();
        System.out.println(result);

        // 未出现异常时
        String result2 = CompletableFuture.supplyAsync(() -> {
            SleepTool.second(1);
            return "s1";
        }).handle((s, t) -> {
            if (t != null) {
                return "hello world";
            }
            return s;
        }).join();
        System.out.println(result2);
    }
}
2
3
4
5
6
7
8
9
10
11
12
13
14
15
16
17
18
19
20
21
22
23
24
25
26
27
28
29
30
31
32
33
执行结果:
hello world
s1
2
如果改变为不抛出异常的代码 if (1 != 2) 后,执行结果:
s1
s1
2
# 四、Lambda
在语法上,Lambda 表达式包含三个部分,参数列表,箭头,主体,比如:
(parameters) -> expression
或
(parameters) -> {statements;}
# 1、函数式接口
Lambda 表达式用在函数式接口上,所谓函数式接口,是只定义了一个抽象方法的接口(Interface),接口中是否有默认方法,不影响。
注解 @FunctionalInterface 可以帮助我们在设计函数式接口时防止出错。
我们常用的 Runnable、Callable 都是函数式接口,JDK8 中新增了几个函数式接口:
# (1) Predicate
包含 test() 方法,接受泛型的 T,返回 boolean,可以视为断言(检查)接口
# (2) Consumer
包含 accept() 方法,接受泛型的 T,无返回,可以视为数据消费接口
# (3) Function<T, R>
包含 apply() 方法,接受泛型的 T,返回 R,可以视为映射转换接口
# (4) Supplier
包含 get() 方法,无输入,返回 T,可以视为创建一个新对象接口
# (5) UnaryOperator
扩展至 Function<T,T>,所以这个本质上也是一个映射转换接口,只不过映射转换后的类型保持不变
# (6) BiFunction<T, U, R>
包含 apply() 方法,接受泛型的 T、U,返回 R,可以视为复合型映射转换接口
# (7) BinaryOperator
扩展至 Function BiFunction<T,T,T>,所以这个本质上也是一个复合型映射转换接口,只不过映射转换后的类型保持不变
# (8) BiPredicate <T, U>
包含 test 方法,接受泛型的 T,U,返回 boolean,可以视为复合型断言(检查)接口
# (9) BiConsumer<T,U>
包含 accept() 方法,接受泛型的 T,U,无返回,可以视为复合型数据消费接口
# (10) IntPredicate
为了防止自动装箱机制,而特意声明的原始类型特化的函数式接口,在意义上,和对应的 Predicate 接口并没有差别。
# 2、函数描述符
函数式接口的抽象方法的签名基本上就是 Lambda 表达式的签名。我们将这种抽象方法叫作函数描述符。
Runnable 接口可以看作一个什么也不接受什么也不返回(void)的函数的签名,因为它只有一个叫作 run() 的抽象方法,这个方法什么也不接受,什么也不返回(void)。
我们可以用 () -> void 代表参数列表为空,且返回 void 的函数。这正是 Runnable 接口所代表的。我们于是可以称 () -> void 是 Runnable 接口的函数描述符。
从函数描述符来看,Callable 接口和 Supplier 接口是一样的,都是 () -> X,所以同一个 Lambda 可以同时用在这两个函数式接口上,比如:
Callable<Integer> callable = () -> 33;
Supplier<><Integer> supplier = () -> 33;
2
# 五、Disruptor
# 1、应用背景和介绍
Disruptor 是英国外汇交易公司 LMAX 开发的一个高性能队列,研发的初衷是解决内部的内存队列的延迟问题,而不是分布式队列。基于 Disruptor 开发的系统单线程能支撑每秒 600 万订单,2010 年在 QCon 演讲后,获得了业界关注。
据目前资料显示:应用 Disruptor 的知名项目有如下的一些:Storm、Camel、Log4j2,还有目前的美团点评技术团队也有很多不少的应用,或者说有一些借鉴了它的设计机制。
Disruptor 是一个高性能的线程间异步通信的框架,即在同一个 JVM 进程中的多线程间消息传递。
# 2、传统队列问题
在 JDK 中,Java 内部的队列 BlockQueue 的各种实现,仔细分析可以得知,队列的底层数据结构一般分成三种:数组、链表和堆,堆这里是为了实现带有优先级特性的队列暂且不考虑。
在稳定性和性能要求特别高的系统中,为了防止生产者速度过快,导致内存溢出,只能选择有界队列;同时,为了减少 Java 的垃圾回收对系统性能的影响,会尽量选择 Array 格式的数据结构。这样筛选下来,符合条件的队列就只有 ArrayBlockingQueue。但是 ArrayBlockingQueue 是通过加锁的方式保证线程安全,而且 ArrayBlockingQueue 还存在伪共享问题,这两个问题严重影响了性能。
ArrayBlockingQueue 的这个伪共享问题存在于哪里呢,分析下核心的部分源码,其中最核心的三个成员变量为:
    /** items index for next take, poll, peek or remove */
    int takeIndex;

    /** items index for next put, offer, or add */
    int putIndex;

    /** Number of elements in the queue */
    int count;
2
3
4
5
6
7
8
这3个变量在 ArrayBlockingQueue 的核心 enqueue() 和 dequeue() 方法中经常会用到的,这三个变量很容易放到同一个缓存行中,进而产生伪共享问题。
# 3、高性能的原理
- 引入环形的数组结构:数组元素不会被回收,避免频繁的
GC - 无锁的设计:采用
CAS无锁方式,保证线程的安全性 - 属性填充:通过添加额外的无用信息,避免伪共享问题
- 环形数组结构是整个
Disruptor的核心所在
首先因为是数组,所以要比链表快,而且根据我们对上面缓存行的解释知道,数组中的一个元素加载,相邻的数组元素也是会被预加载的,因此在这样的结构中,cpu 无需时不时去主存加载数组中的下一个元素。而且,你可以为数组预先分配内存,使得数组对象一直存在(除非程序终止)。这就意味着不需要花大量的时间用于垃圾回收。此外,不像链表那样,需要为每一个添加到其上面的对象创造节点对象—对应的,当删除节点时,需要执行相应的内存清理操作。环形数组中的元素采用覆盖方式,避免了 jvm 的 GC。
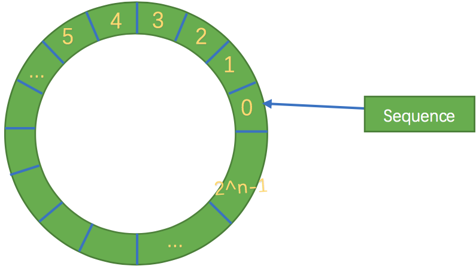
其次结构作为环形,数组的大小为 2 的 n 次方,这样元素定位可以通过位运算效率会更高,这个跟一致性哈希中的环形策略有点像。在 Disruptor 中,这个牛逼的环形结构就是 RingBuffer,既然是数组,那么就有大小,而且这个大小必须是 2 的 n 次方
其实质只是一个普通的数组,只是当放置数据填充满队列(即到达 2 ^ n - 1 位置)之后,再填充数据,就会从 0 开始,覆盖之前的数据,于是就相当于一个环。
每个生产者首先通过 CAS 竞争获取可以写的空间,然后再进行慢慢往里放数据,如果正好这个时候消费者要消费数据,那么每个消费者都需要获取最大可消费的下标。
同时,Disruptor 不像传统的队列,分为一个队头指针和一个队尾指针,而是只有一个角标(上图的 sequence),它属于一个 volatile 变量,同时也是我们能够不用锁操作就能实现 Disruptor 的原因之一,而且通过缓存行补充,避免伪共享问题。该指针是通过一直自增的方式来获取下一个可写或者可读数据。
← JMM和底层实现原理 常见并发面试题 →